Pages

My name is Aubrey Anne.
I'm here to talk about all things beauty.
I adore making new friends, so please,
let me know you've stopped by!
Showing posts with label nyx. Show all posts

Monday, August 3, 2015

Daily Makeup Routine on a Single Mom Budget


Just so we're clear, I feel absolutely ridiculous taking pictures of myself and acting like I'm some sort of expert. I learned all these tricks from articles in magazines, things I've found online, Pinterest pins, and YouTube videos over the years. I have no formal training (although I will someday) in makeup artistry, and I have done a LOT of trial and error up to this point. Over time my makeup habits change, so a few months from now I will probably look back at this and laugh at it.

The only reason I made this video is because I have had so many people ask me to show them how I do my makeup. I will never get a chance to actually sit down with these people and show them, so I am settling for this video. I wasn't brave enough this time to make actual video of myself, so it's just a bunch of pictures with captions to give you the general idea. Maybe some day I will get the guts to do the whole thing on video. I'm brand new at this YouTube stuff!

Enough explaining! For whatever it's worth, here it is. Hope you pick up a few things you didn't know before! And, as always, please leave a comment so I know who's actually looking at this nonsense, and share if you feel so inclined. :)


Loves!
Aubrey Anne

Wednesday, July 2, 2014

My favorite day of the month: When my ipsy Glam Bag arrives!

As always, this post is not sponsored. I do not receive any compensation for the things I write. 
I simply believe in spreading the word about good companies and products.

Each month $10 is automatically deducted from my bank account. In exchange for that $10, I receive a super cute makeup bag full of awesome cosmetics! This fulfills my MUST BUY MAKEUP need, without spending much money at all. Each month there is a new bag designed especially for ipsy, and each bag comes with 4 or 5 full-size, high-end products.

When you sign up (and you should), they ask you to fill out a quick survey about your skin type, colors, favorite brands, etc.

There have been things in these bags I never would have tried on my own, but now I adore and use every day. Each one of the products in the bag is worth at least $10 all by itself. I haven't found another service that is as good a deal as this one. (Although, there are a lot of these out there. The monthly grab-bag is kind of a thing right now. You can even get one for your baby, which comes with their age-appropriate toys and products. Or one for food. Or one for your dog. Whatever you're into. Mine happens to be makeup, and ipsy seems to be the best deal out there for makeup.) 

I have somehow lost the picture from April's bag, which happens to have been my favorite, but I found a review someone else did... you can see it here. I got more actual makeup in April's bag, and it was my style (dramatic black eyeliner, fake lashes, bright pink lipstick, etc.) so that month was my favorite so far. 

May's bag was spring-inspired (below). The bag was green and cream canvas, and came with 5 things: 
  1. Some weird spray water stuff for your face... still haven't figured out what that's for. (If one of you gets this for Christmas, just smile and say thank you.) 
  2. Hang Ten sunscreen, which I use under my makeup every day I'm planning to leave the house.
  3. eva-nyc Therapy Session Hair Mask, which I love. 
  4. That Pacifica stuff is pretty great, I use it as my eyeshadow when I'm looking for something really light and natural, or as highlight and bronzer. 
  5. My personal favorite from May was the Too Faced Chocolate Soleil bronzer. This stuff is amazing and I use it every single day. It's made with actual cocoa powder, doesn't make me break out, and lasts forever. Love it. 

May
June was even better. I kinda wish you could have heard me squeal when I opened it.

The bag is nylon, not my favorite look, but it's serving a great purpose holding all my lipstick in one place now. (A few more months and I'll be giving the bags away because I won't know what to do with them... how cute will that be? Little birthday gifts in cute makeup bags?) This is what I got in mine:

  1. Be a... bombshell mascara, which is great. (Full-size, yay!)
  2. Marc Anthony beach waves beach spray, which I liked more than I thought I would.
  3. NYX butter gloss, by FAR my favorite product this month! I will be buying more of this.
  4. The shimmer eyeliner is great, but I already have several of these, even one in this very color. I do love it, but will probably end up giving it away, because I don't have a need for more.
  5. Skinn Olive and Enzyme Cleanser - this is one of those things I got because I included my oily skin in my profile.
June
My very favorite thing I got from ipsy was Cailyn high-pigment lip balm. I adore it so much I bought two more. Oh, after they send out the bags, they have sales on the products in them, so you can buy more if you liked it. And every time 5 people sign up for their own ipsy bags with my link, I get to choose a free product for my next bag... so if you do sign up, use my link, pretty please? :) 


Is it July yet????? I can't wait for my bright pink package to come to the door!

Wednesday, June 25, 2014

Alternative Smokey Eye

If you don't have a large eyelid (or even if you do), this is a good alternative to the original smokey eye. It's the exact same process, but only covers the lid, leaving the upper half of your lid as highlight.


Wednesday, June 18, 2014

Smokey pallet by NYX - an $8 alternative to the $53 Naked pallet


I want to show you the way I do a smokey eye, and a few extra tips along the way about eyebrows and mascara. Try to bear with me, as this post required a lot of pictures. 

Oh, and I'm not sponsored, even though it sounds like it. I just really love eyeslipsface products, so I use a lot of them. :)


These are the four makeup brushes I use to do my eye makeup every day. 
The far left is a Sonia Kashuk brush I've had forever, which is good for applying mass amounts of color. The second to the left is e.l.f. essential defining eye brush, my all-time favorite brush. The third is the e.l.f. Studio line small angled brush, and the fourth is the e.l.f. Studio line contour brush
No, I'm not exaggerating. I use four makeup brushes just for my eyelids. There is no other way to achieve these precise looks, so if you've been attempting it with just one brush (or God forbid, that little spongey applicator that came with the pallet), you've found your first problem.

I'm going to show you Smokey by NYX and Sex Bomb by NYX. I got them for about $8 each and you can find them pretty much anywhere. 

I use these two pallets together, because I like two or three of the colors from each. You don't need both, you can do this look with either one of these pallets, but I use both, so that's what I show here.

STEP 1: Start with your absolute lightest color (for this I used the one that's almost white). Your lightest color always goes first, and it's always under your eyebrow (to create a highlight) and around the inner corners of your eyes. Pull the light color down under your eye, by your bottom lashes, to make them stand out a little too.


STEP 2: Next is your second-lightest color. Cover the lid with this color. 


STEP 3: The next darkest color makes a vague triangle around the outer edge and crease. (I prefer purple to blue, but if I had blue eyes, I'd probably choose blue.) If you have small eyelids, skip this step and move straight to step 4. 


STEP 4: This is the part where you start to feel like the Goth from high school. Trust me (and yourself). You have to apply too much to start with, but I promise it will be OK. We'll be blending soon. 

I use the Sex Bomb pallet for this, as I prefer the matte black color to the sparkly black in the Smokey pallet, but it's really whatever you like best. (Any pallet can follow this process, just go from lightest to darkest!)

Your darkest color goes in the crease and makes a triangle at the outer corner. Absolutely none of this color goes in the inner corner! Keep this color away from the light inner corner you already created, or you will look sunken in and dead. Anywhere you put the white, back in Step 1, this color does not go there.


STEP 5: Blend like crazy. You will lose a lot of the color during this process, which is why we put on too much to start with. You are going for smokey, not Cat Woman. 
(OK, maybe a little bit of Cat Woman.) 


After you blend, add a little of the cream color wherever your dark color ended up and you didn't want it. (Tip: by now my tissue is filthy... this process is messy. I usually don't do my foundation until after my eye makeup, but I didn't want to scare you guys!)


STEP 6: Eyeliner - I use e.l.f. eye brightening eyeliner ($1) for the bottom lid and e.l.f. liquid eyeliner ($1) for the top. 


STEP 7: Eyebrows and mascara

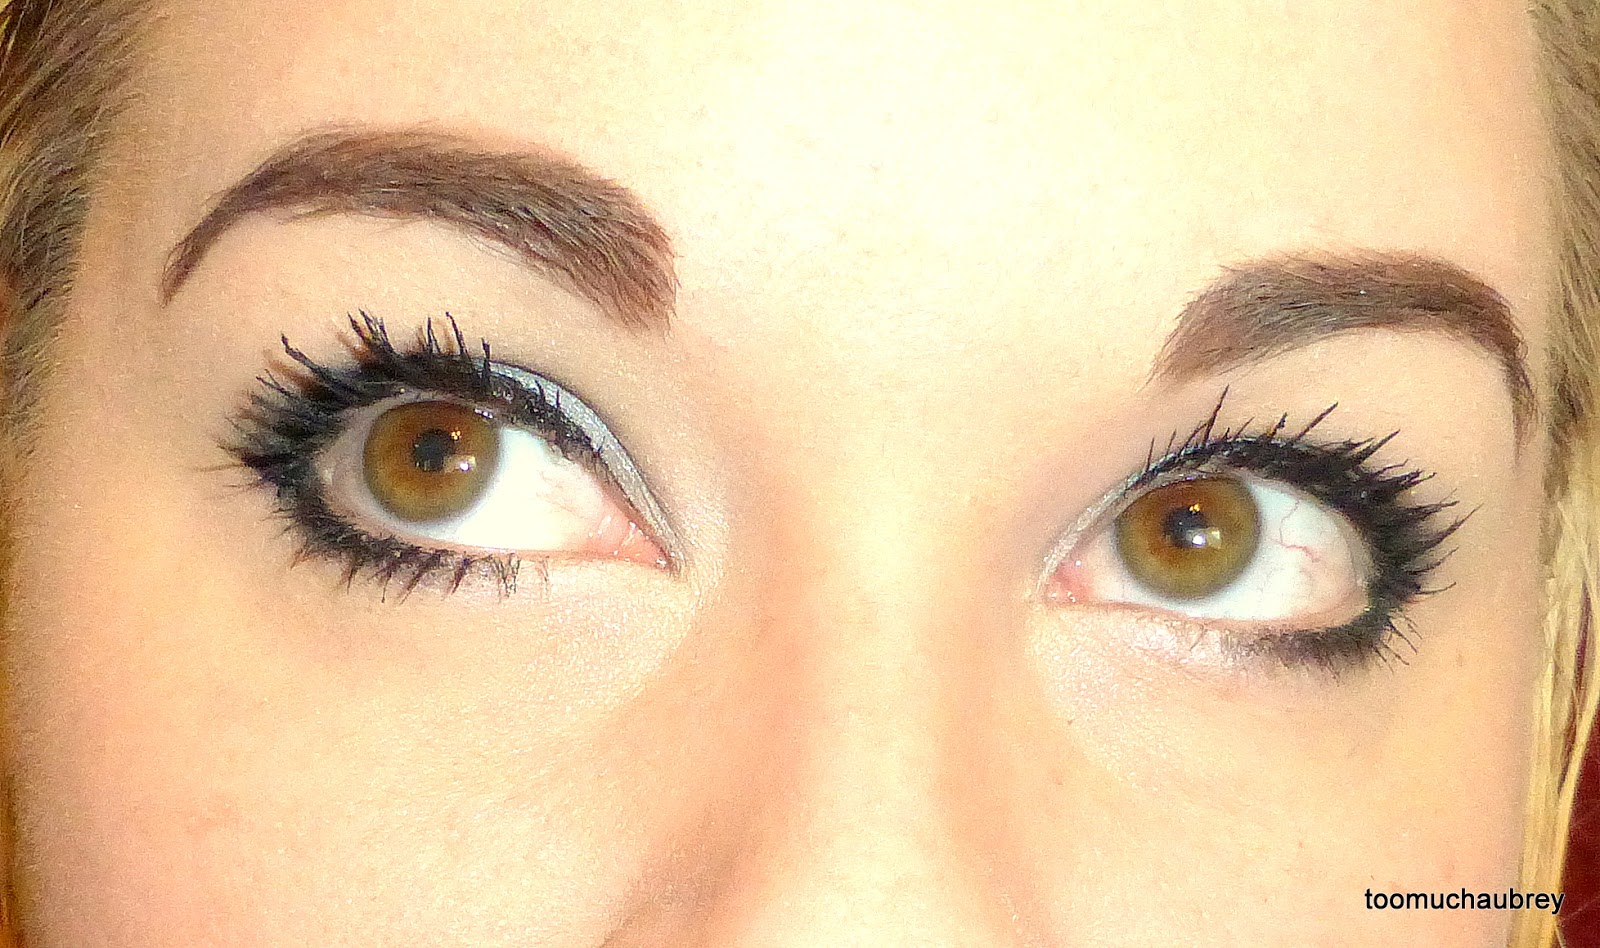
The picture below was taken to show you why I fill in my eyebrows. I have a lot of "how do you do your eyebrows?" comments, and I have to say, I don't do anything special. I pluck them every single day before I do my makeup, and I fill them in with e.l.f. eyebrow kit in Dark. My eyebrows are naturally black, but as I get older they are less full, and I find it makes a big difference to fill them in. (Try to ignore the eyebrow hair on the left which is currently on strike.)


As you know, my favorite mascara changes by the minute. (You already know I LOVE the 3D fiber lashes, but I don't use them every day.) For every day mascara I use Maybelline The Colossal Volum' Express: Cat Eyes.

I have two tubes of this because when I buy a new one, I hold onto the old one as long as I can stand it (and extend its life with this trick). The new one gives me the dramatic affect I'm ultimately going for, but the older one gives me the volume to build on. If the first coat of mascara is too new, it's too wet, and will just clump all ugly-like. First coat: older tube of mascara, second coat: new tube of mascara. Don't forget to curl your eyelashes before the mascara! If you do it after it makes the clumping much worse.


(If you find this look doesn't work well on you, try the alternate smokey eye, 
which you can find here.)

That's all I have for you. Thanks for reading!
Leave a comment, pretty please! 
And if you can share this post, that would be pretty sweet of you as well. :)

Contact Me

Name

Email *

Message *